Video Screen Recording using Microsoft PowerPoint

Hi there, Allan Cantos here. I hope you are having a great day.

Today, I share to you about this Microsoft PowerPoint cool features that I just noticed recently.

While looking for video capturing software for my colleague in the office (because I can’t use my personal licensed Screencast-O-matic video recording software on the company laptop), someone told me that you can use Powerpoint. I thought you can use Microsoft PowerPoint to insert videos only to your slides but I was wrong. This will be your “Video Screen Recording” software alternative.

On the new 2016 Microsoft Powerpoint, you’ll notice a new addition to the “Media” ribbon tab under the “Insert” menu. Yes, you’re right! You’ll find the “Screen Recording” button that has been added. Out of curiosity, I ran a test.

This is a really cool feature that Microsoft Powerpoint offers. You don’t need to purchase video capturing software anymore. What Powerpoint allows you to do now is record your screen outside the PowerPoint and import that recording to your slides automatically. Not only that, you can use this feature to record your screen to record something and have it exported as a separate media file.

So, from the “Insert” menu and under the”Media” ribbon tab, select the “Screen Recording” icon.

You will be prompted to select the extent of the area you want to capture.

It greys out your screen, then you can go ahead and select an area you want to capture. It pretty much acts as the other video recording software.

You also have an option to include audio and your pointer. Once you are ready, hit that “Record” button and start recording your video after the 3 seconds delay grace period.

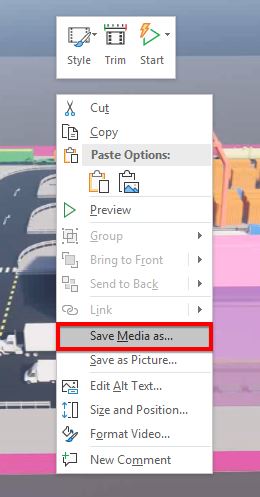
Once you’re done with recording, your video will automatically be added to your PowerPoint slide. But this cool feature does not stop from there. You can actually export your video as an independent media file, in MP4 format.

To do that, just “right-click” on the inserted video in your PowerPoint slide.

And select “Save Media as”. Then you will be prompted where would you like to save the file, then name your media file accordingly.

I hope you find this helpful.

Have a wonderful day.

Cheers!

How to add your Power BI Dashboard to your BIM 360 Project Home Dashboard

Hello there, Allan Cantos here. I hope you are all well.

As a pre-requisite to this tutorial, I assumed you already have built your Power BI Dashboard that you would like to link to your BIM 360 Project Home Dashboard. If not yet, I would advise you to build one first then come back to this tutorial.

Alright, let’s get started.

Here is what we are trying to achieve:

Before you can do modifications to the “Project Home” page, you must have as admin rights.

You can access the “Project Admin” page by clicking the “9-dots” located at the upper left-hand corner (just below the Autodesk BIM 360 logo).

And, once again, before you can modify the “Project Home” page, you must have a “Project Admin” rights.

Now, go back to the “Project Home” page and click the “Customize” setting icon that you’ll find at the upper right-hand side of your dashboard.

An now you are ready to add a new visualisation card. Click on Card Library.

And from the “Card Library”, scroll down until you find the “Power BI”.

Select it and then click “Add Card”.

Click “Configure”

Next, log in to your Power BI account on your Chrome browser and open the Power BI report.

After that, select “File” and from the drop-down list, select “Publish to web”.

And this will give you the “Embed code”. Select the link highlighted in yellow below and hit CTRL-C to copy.

Go back to your BIM 360

Give your Power BI “Card Title” a name then paste (CTRL-V) the link copied from the previous step to “Partner URL”. Make sure to delete the texts before https and the texts about frame border at the end of the pasted URL.

Click the “Save” button and you’ll now be able to see your Power BI dashboard from you BIM 360 Project Home page.

I hope you find this tutorial helpful. If you have any questions, please let me know by leaving your comments.

Have a great day!

Cheers!

Brushing up on Power BI Basics

Allow me to share the 3 links below that will help you understand the basics of Power BI.

Happy learning!

Cheers.

Positive SSL